Networking
Networking and Scaling#
In this section we'll see how OSToy uses intra-cluster networking to separate functions by using microservices and visualize the scaling of pods.
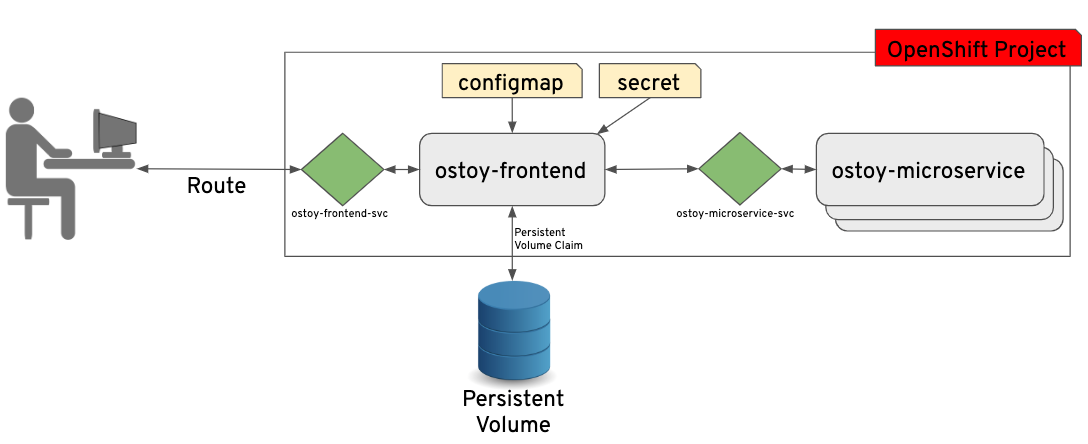
Let's review how this application is set up...

As can be seen in the image above, we have defined at least 2 separate pods, each with its own service. One is the frontend web application (with a service and a publicly accessible route) and the other is the backend microservice with a service object so that the frontend pod can communicate with the microservice (across the pods if more than one). Therefore this microservice is not accessible from outside this cluster, nor from other namespaces/projects (due to OSD's network policy, ovs-networkpolicy). The sole purpose of this microservice is to serve internal web requests and return a JSON object containing the current hostname (which is the podname) and a randomly generated color string. This color string is used to display a box with that color displayed in the tile titled "Intra-cluster Communication".
Networking#
1. Intra-cluster networking#
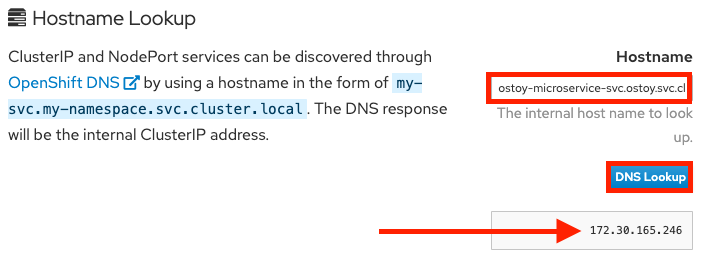
Click on Networking in the left menu. Review the networking configuration. The right tile titled "Hostname Lookup" illustrates how the service name created for a pod can be used to translate into an internal ClusterIP address.
2. Lookup internal IP address of the service#
Enter the name of the microservice we created in the right tile ("Hostname Lookup") following the format of my-svc.my-namespace.svc.cluster.local which we created in the service definition of ostoy-microservice.yaml which can be seen here:
apiVersion: v1
kind: Service
metadata:
  name: ostoy-microservice-svc
  labels:
    app: ostoy-microservice
spec:
  type: ClusterIP
  ports:
    - port: 8080
      targetPort: 8080
      protocol: TCP
  selector:
    app: ostoy-microservice
In this case we will enter: ostoy-microservice-svc.ostoy.svc.cluster.local
3. IP address returned#
We will see an IP address returned. In our example it is 172.30.165.246. This is the intra-cluster IP address; only accessible from within the cluster.

Scaling#
OpenShift allows one to scale up/down the number of pods for each part of an application as needed. This can be accomplished via changing our replicaset/deployment definition (declarative), by the command line (imperative), or via the web UI (imperative). In our deployment definition (part of our ostoy-fe-deployment.yaml) we stated that we only want one pod for our microservice to start with. This means that the Kubernetes Replication Controller will always strive to keep one pod alive. We can also define autoscalling based on load to expand past what we defined if needed which we will do in a later section of this lab.
If we look at the tile on the left we should see one box randomly changing colors. This box displays the randomly generated color sent to the frontend by our microservice along with the pod name that sent it. Since we see only one box that means there is only one microservice pod. We will now scale up our microservice pods and will see the number of boxes change.
4. Confirm number of pods running#
To confirm that we only have one pod running for our microservice, run the following command, or use the web UI.
$ oc get pods
NAME                                   READY     STATUS    RESTARTS   AGE
ostoy-frontend-679cb85695-5cn7x       1/1       Running   0          1h
ostoy-microservice-86b4c6f559-p594d   1/1       Running   0          1h
5. Scale pods via Deployment definition#
Let's change our microservice definition yaml to reflect that we want 3 pods instead of the one we see. Download the ostoy-microservice-deployment.yaml and save it on your local machine, if you didn't do so already.
- Open the file using your favorite editor. Ex:
vi ostoy-microservice-deployment.yaml - Find the line that states
replicas: 1and change that toreplicas: 3. Then save and quit.
It will look like this
shell
spec:
    selector:
      matchLabels:
        app: ostoy-microservice
    replicas: 3
-
Assuming you are still logged in via the CLI, execute the following command:
oc apply -f ostoy-microservice-deployment.yaml -
Confirm that there are now 3 pods via the CLI (
oc get pods) or the web UI (Workloads > Deployments > ostoy-microservice). - See this visually by visiting the OSToy app and counting how many boxes there are now. It should be three.

6. Scale down via CLI#
Now we will scale the pods down using the command line.
- Execute the following command from the CLI:
oc scale deployment ostoy-microservice --replicas=2 - Confirm that there are indeed 2 pods, via the CLI (
oc get pods) or the web UI. - See this visually by visiting the OSToy app and counting how many boxes there are now. It should be two.
7. Scale down via web UI#
Lastly, let's use the web UI to scale back down to one pod.
- In the project you created for this app (ie: "ostoy") in the left menu click Workloads > Deployments > ostoy-microservice. On the left you will see a blue circle with the number 2 in the middle.
- Click on the down arrow to the right of that to scale the number of pods down to 1.

- See this visually by visiting the OSToy app and counting how many boxes there are now. It should be one.
- You can also confirm this via the CLI or the web UI